Easy No-Bake Fruity Pebbles Cheesecake Tacos – Better Than Takeout
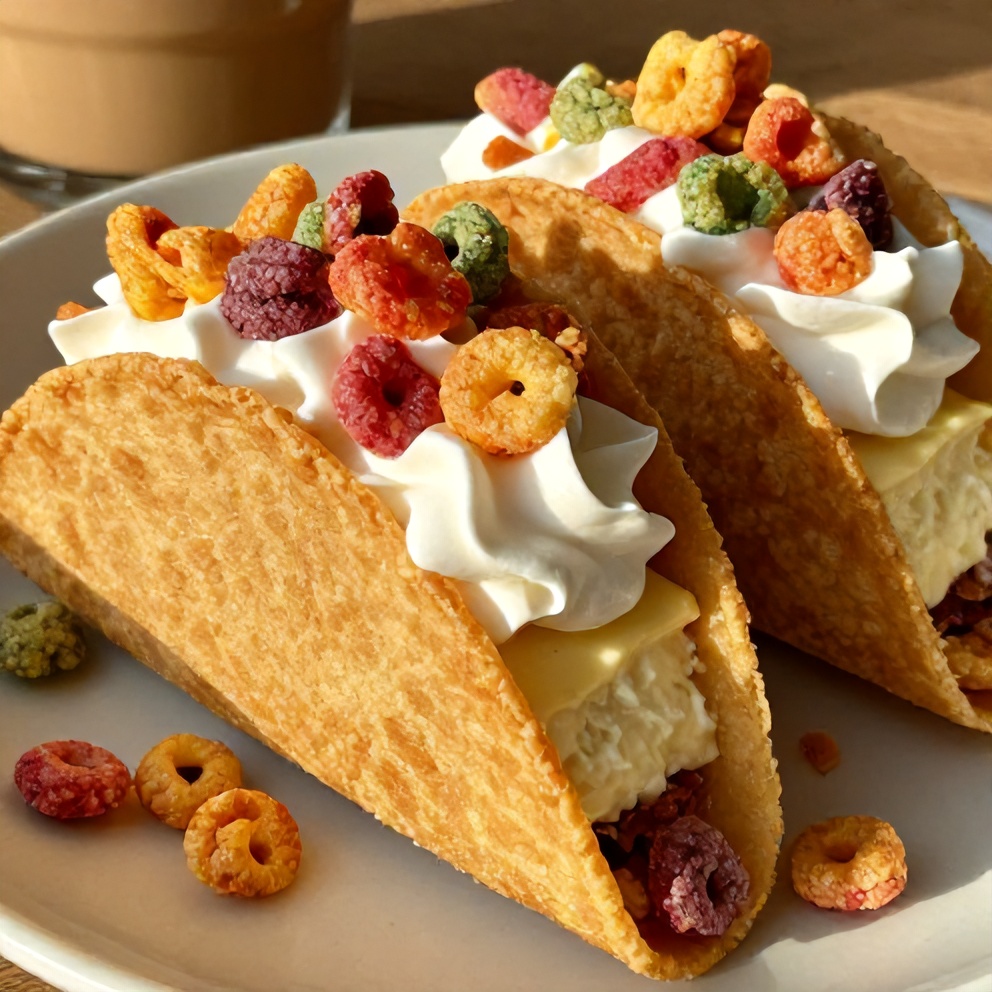
Easy No-Bake Fruity Pebbles Cheesecake Tacos are the ultimate better-than-takeout dessert that’s ready in just 15 minutes. After making these countless times, I’ve perfected the creamy, crunchy combination that’s irresistible. Start with a crispy graham cracker shell, filled with a velvety Fruity Pebbles cheesecake, and topped with whipped cream and more cereal for a fresh, fun treat. Keep reading for my best tips. If you love recipes like this, you’ll also enjoy Roasted Strawberry Basil Ice Cream with a Lime Twist and Creamy Vegan Sun Dried Tomato Pasta Ready in 25 Minutes.
Why This Easy No-Bake Fruity Pebbles Cheesecake Tacos – Better Than Takeout Is Pure Comfort
- Quick and easy to make with no baking required
- Crispy graham cracker shell with a creamy Fruity Pebbles cheesecake filling
- Perfect for parties, potlucks, or a fun after-school snack
- Better than takeout and customizable with your favorite cereal
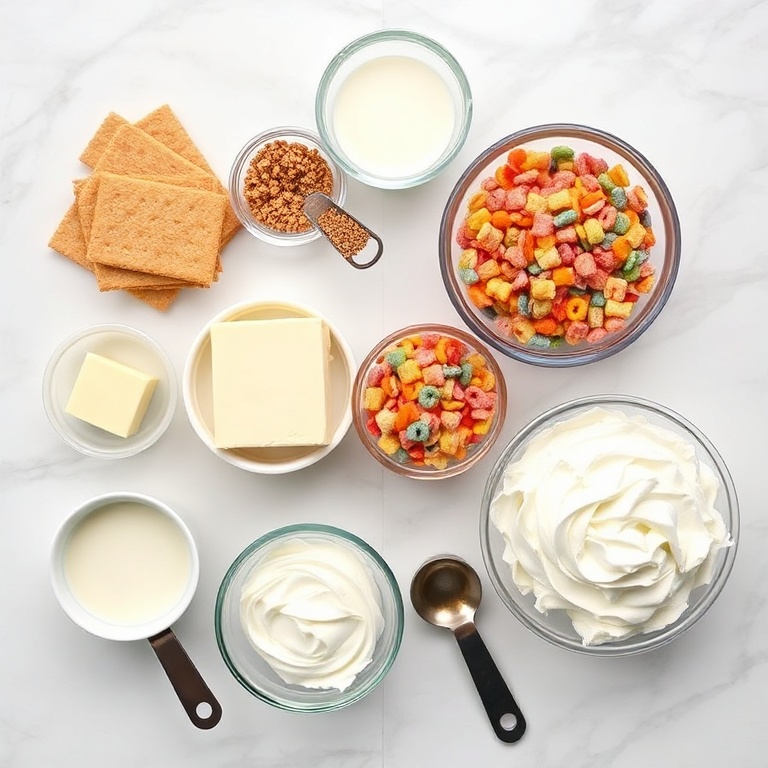
What You'll Need for Easy No-Bake Fruity Pebbles Cheesecake Tacos – Better Than Takeout
Choosing the right ingredients makes a big difference, but this recipe is forgiving enough to work with what you have.
- Graham crackers
- Butter
- Cream cheese
- Sweetened condensed milk
- Fruity Pebbles cereal
- Whipped cream
- Vanilla extract
- Salt
- Optional: Additional Fruity Pebbles cereal for garnish
📝 Ingredient Notes
- Graham crackers: Use about 10-12 full sheets to make 12 taco shells.
- Cream cheese: Ensure it's at room temperature for a smooth cheesecake mixture.
🛒 Tools & Equipment I Recommend
- Food processor — Makes quick work of crushing graham crackers and ensures even consistency. I use the Cuisinart Custom 14-Cup Food Processor. → See on Amazon
- Stand mixer — Helps achieve a smooth, lump-free cheesecake filling. The KitchenAid Artisan Series 5 Quart Tilt-Head Stand Mixer is my go-to. → See on Amazon

How to Make Easy No-Bake Fruity Pebbles Cheesecake Tacos – Better Than Takeout
- Make the graham cracker shells: Crush graham crackers in a food processor, mix with melted butter, and press into taco shapes on a baking sheet. Chill for 10 minutes.
- Prepare the cheesecake filling: Beat cream cheese, sweetened condensed milk, and vanilla extract until smooth. Fold in Fruity Pebbles cereal.
- Assemble the cheesecake tacos: Spoon the cheesecake mixture into the chilled graham cracker shells, top with whipped cream and additional Fruity Pebbles cereal.
Cook's Tips for Perfect Easy No-Bake Fruity Pebbles Cheesecake Tacos – Better Than Takeout
- Common mistake and fix: Avoid overfilling the graham cracker shells to prevent them from breaking. If they do break, simply patch them with more melted butter and crushed graham crackers.
- Time-saving tip: Prepare the graham cracker shells ahead of time and store them in the refrigerator until ready to use. The cheesecake filling can also be made in advance and chilled.
- Flavor boost: Add a tablespoon of your favorite liqueur, like orange juice or rum, to the cheesecake mixture for an extra layer of flavor.
Storing & Reheating Easy No-Bake Fruity Pebbles Cheesecake Tacos – Better Than Takeout
Short-Term Storage
Store in an airtight container in the fridge. Store leftover cheesecake tacos in an airtight container in the refrigerator for up to 3 days. Make-ahead tip: Graham cracker shells and cheesecake filling can be made ahead of time and assembled just before serving.
Freezing Easy No-Bake Fruity Pebbles Cheesecake Tacos – Better Than Takeout
Not recommended for freezing.
How to Reheat Without Drying It Out
Oven: No need to reheat; enjoy chilled or at room temperature. Microwave: No need to reheat; enjoy chilled or at room temperature.
Recipe Notes
- Chef tip: For a fun presentation, serve the cheesecake tacos on a platter with a bowl of additional Fruity Pebbles cereal for dipping.
- Make-ahead: Assemble the cheesecake tacos up to 2 hours ahead of time and refrigerate until ready to serve.
- Scaling: This recipe can be easily doubled or tripled to serve a crowd.
- Troubleshooting: If the cheesecake filling is too thick, add a tablespoon or two of milk to achieve your desired consistency.
Want to level up this recipe?
Springform pan — Makes it easy to remove the cheesecake from the pan and creates perfectly shaped taco shells. I recommend the Wilton Perfect Results Premium Non-Stick Springform Pan. → Check price on Amazon
Easy No-Bake Fruity Pebbles Cheesecake Tacos – Better Than Takeout
Ingredients
Main Ingredients
- Graham crackers
- Butter
- Cream cheese
- Sweetened condensed milk
- Fruity Pebbles cereal
- Whipped cream
Seasonings
- Vanilla extract
- Salt
Optional Toppings
- Additional Fruity Pebbles cereal for garnish
Instructions
- Make the graham cracker shells: Crush graham crackers in a food processor, mix with melted butter, and press into taco shapes on a baking sheet. Chill for 10 minutes.
- Prepare the cheesecake filling: Beat cream cheese, sweetened condensed milk, and vanilla extract until smooth. Fold in Fruity Pebbles cereal.
- Assemble the cheesecake tacos: Spoon the cheesecake mixture into the chilled graham cracker shells, top with whipped cream and additional Fruity Pebbles cereal.
Notes
- Chef tip: For a fun presentation, serve the cheesecake tacos on a platter with a bowl of additional Fruity Pebbles cereal for dipping.
- Make-ahead: Assemble the cheesecake tacos up to 2 hours ahead of time and refrigerate until ready to serve.
- Scaling: This recipe can be easily doubled or tripled to serve a crowd.
- Troubleshooting: If the cheesecake filling is too thick, add a tablespoon or two of milk to achieve your desired consistency.
Storage
- Fridge: Store leftover cheesecake tacos in an airtight container in the refrigerator for up to 3 days.
- Freezer: Not recommended for freezing.
- Oven reheat: No need to reheat; enjoy chilled or at room temperature.
- Microwave reheat: No need to reheat; enjoy chilled or at room temperature.
- Make ahead: Graham cracker shells and cheesecake filling can be made ahead of time and assembled just before serving.
Nutrition Per Serving
- Calories: 250
- Protein: 3g
- Fat: 12g
- Carbs: 32g
- Fiber: 1g
- Sugar: 20g
- Sodium: 150mg
- Cholesterol: 35mg
- Sat. Fat: 7g
Nutritional values are estimates only. Actual values may vary by brand and portion size.
Easy No-Bake Fruity Pebbles Cheesecake Tacos – Better Than Takeout FAQs
Yes, you can make the graham cracker shells and cheesecake filling ahead of time and assemble them up to 2 hours before serving.
The cheesecake filling may have been overmixed or not enough milk was added. To fix, add a tablespoon or two of milk and mix gently until the desired consistency is reached.
Yes, you can use any of your favorite cereals to create a unique twist on this dessert. Some popular options include Cinnamon Toast Crunch, Lucky Charms, or even crushed cookies like Oreos.
Absolutely! These cheesecake tacos are perfect for any occasion, including fall parties. For a seasonal touch, consider using a spiced cereal or adding a drizzle of caramel sauce on top.
No, the air fryer is not suitable for making these cheesecake tacos. The graham cracker shells require chilling and the cheesecake filling needs to be kept cold.
A Warm Final Note
I can’t wait for you to try Easy No-Bake Fruity Pebbles Cheesecake Tacos – Better Than Takeout and see how effortlessly it comes together. When you make it, pop back here and leave a rating or share how it turned out — I love hearing from you!